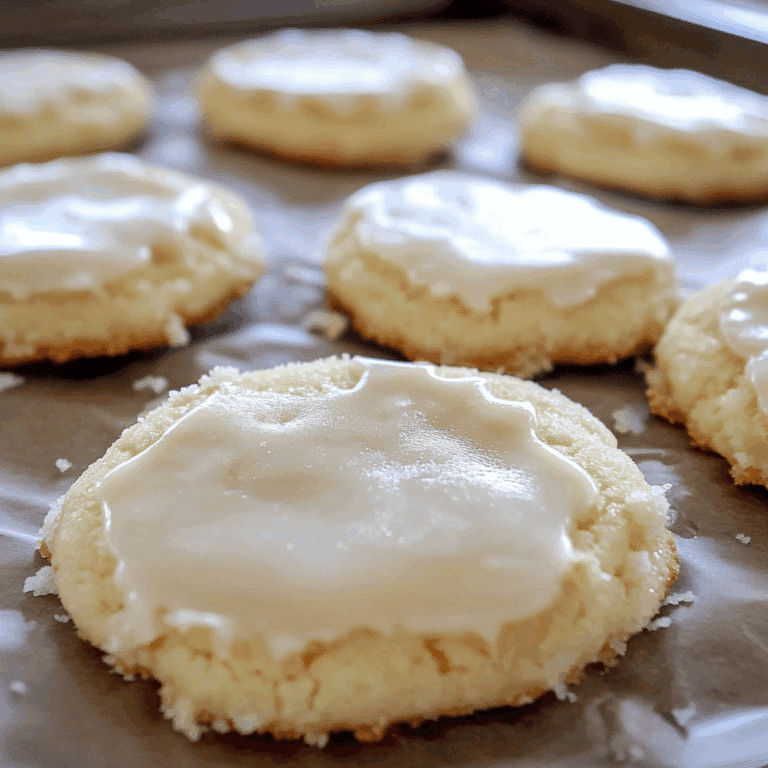
Easy Halloween Cookies to Delight Your Guests
If you’re searching for a fun, festive, and utterly delicious treat, these Halloween Cookies will become your new go-to recipe this spooky season. Bursting with vibrant colors, playful shapes, and flavors that perfectly capture the festive spirit, these cookies are easy to make and guaranteed to delight every guest at your party. Whether you’re a baking pro or a beginner, this recipe guides you through every step to create treat-worthy delights that taste as good as they look.
Why You’ll Love This Recipe
- Simple Ingredients: Uses easily found ingredients that come together quickly, making baking stress-free.
- Festive Fun: Perfect for adding a colorful, spooky touch to any Halloween gathering.
- Kid-Friendly: A great project for baking with kids, encouraging creativity and family bonding.
- Customizable: Adapt the decorations and flavors to suit your taste or dietary needs with ease.
- Impressive Presentation: Looks like a professional bakery treat without the hassle or expensive tools.
Ingredients You’ll Need
These ingredients are straightforward but essential to crafting Halloween Cookies that deliver the perfect combination of crispness, flavor, and festive appeal. Each one plays a unique role in texture, sweetness, and color to make your cookie experience a breeze and a blast.
- All-purpose flour: The perfect base that provides structure and holds your cookies together.
- Butter: Adds rich flavor and creates a tender, melt-in-your-mouth texture.
- Sugar: Sweetens and helps cookies brown to a beautiful golden color.
- Egg: Binds ingredients and adds moisture for a soft yet sturdy dough.
- Vanilla extract: Brings warmth and depth to the flavor, elevating the taste.
- Baking powder: Ensures cookies rise slightly for a light, soft bite instead of being flat and hard.
- Food coloring and sprinkles: Essential for transforming simple cookies into eye-catching Halloween treats.
- Decorative icing: Adds detail and fun seasonal designs like ghosts, pumpkins, and spiders.
Variations for Halloween Cookies
One of the best parts about this Halloween Cookies recipe is how easy it is to customize and make your own. Whether you want to experiment with flavors, adjust for dietary preferences, or switch up the decorations, these tweaks keep the baking exciting and uniquely yours.
- Gluten-free option: Swap regular flour for a gluten-free blend to keep it friendly for sensitive guests.
- Spiced twist: Add cinnamon, nutmeg, or pumpkin spice to bring warm, seasonal notes to your dough.
- Chocolate lovers: Mix in cocoa powder or use chocolate icing for a rich, decadent flavor.
- Vegan-friendly: Substitute butter with coconut oil and use a flax egg instead of real eggs.
- Healthy swaps: Reduce sugar or use natural sweeteners like honey or maple syrup for a guilt-free treat.

How to Make Halloween Cookies
Step 1: Prepare Your Ingredients
Gather all your ingredients and measure everything carefully. Soften the butter to room temperature for easier mixing. Preheat your oven to 350°F (175°C) and line baking sheets with parchment paper.
Step 2: Mix the Dough
In a large bowl, cream together the softened butter and sugar until light and fluffy. Beat in the egg and vanilla extract until smoothly combined. Gradually add the flour and baking powder, mixing gently until a soft dough forms. Avoid overmixing to keep the cookies tender.
Step 3: Color and Shape Your Cookies
Separate dough into portions if you’re using food coloring—knead each with your desired color until evenly tinted. Roll out the dough on a floured surface to about 1/4 inch thickness. Use Halloween-themed cookie cutters like pumpkins, bats, and ghosts to cut out shapes.
Step 4: Bake to Perfection
Place the cookies on the lined baking sheets, leaving space between each to allow for slight spreading. Bake for 8-12 minutes or until the edges start to turn golden. Let them cool on the baking sheet for 5 minutes before transferring to a wire rack.
Step 5: Decorate with Icing and Sprinkles
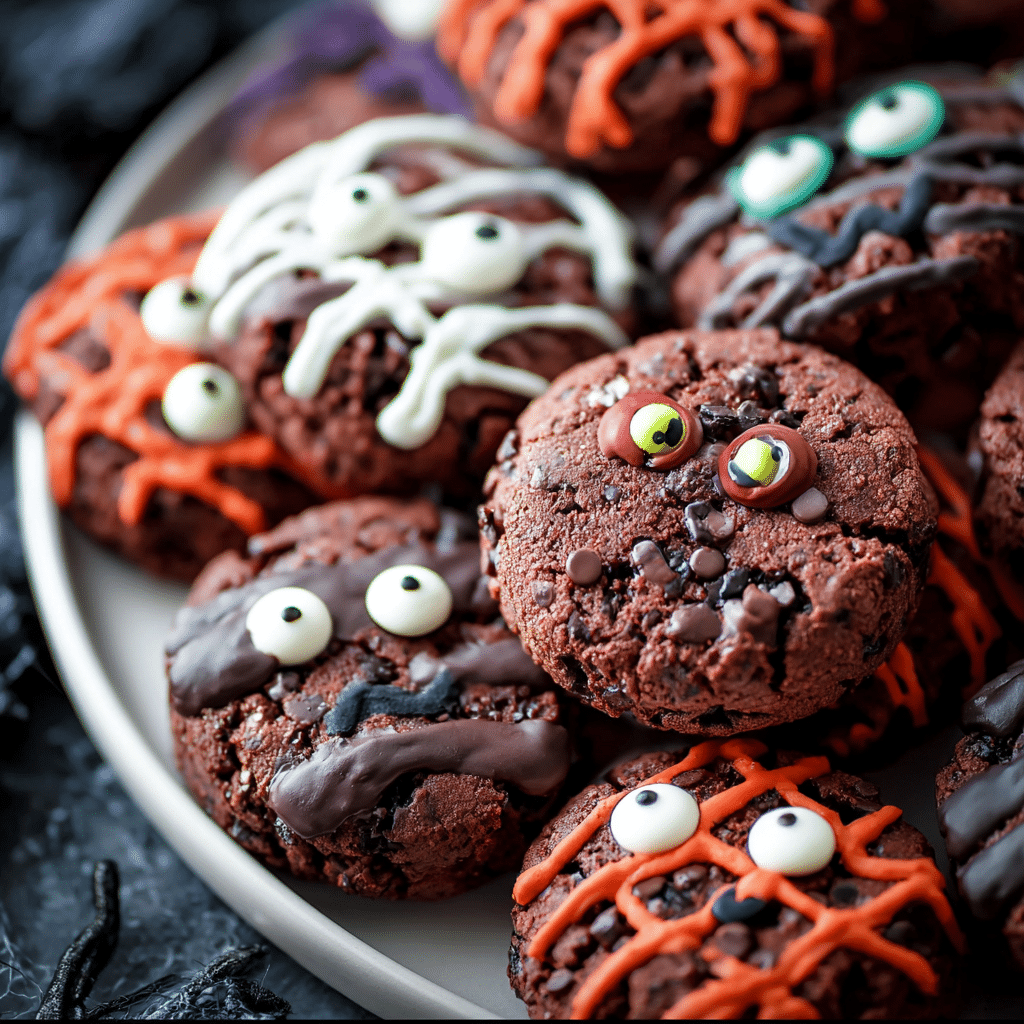
Once completely cool, decorate your Halloween Cookies with colorful icing, edible markers, and sprinkles. Get creative with designs that match your party’s spooky theme.
Pro Tips for Making Halloween Cookies
- Chill dough before cutting: Keeps shapes sharp and prevents spreading in the oven.
- Use parchment paper: Ensures your cookies don’t stick and makes cleanup easy.
- Don’t overbake: Take cookies out when edges are slightly golden to maintain a soft center.
- Customize icing consistency: Thicker icing works better for details, while thinner spreads easily for base layers.
- Store in airtight containers: Keeps cookies fresh and moist for days.
How to Serve Halloween Cookies
Garnishes
Elevate your serving presentation by adding edible glitter, colored sugar, or candy eyes on top of the decorated cookies. These little additions help bring the Halloween characters to life and make the cookies almost too cute to eat.
Side Dishes
Pair your Halloween Cookies with warm spiced cider, hot chocolate, or a fun punch for a complete festive spread. Fresh fruit trays or cheese platters complement the sweetness and balance the flavors well.
Creative Ways to Present
Arrange cookies on a themed platter or tiered cake stand for stunning visual impact. Wrapping them in clear bags tied with orange or black ribbons makes for charming party favors that guests will love to take home.
Make Ahead and Storage
Storing Leftovers
Place leftover Halloween Cookies in an airtight container at room temperature. They will stay fresh and soft for up to one week, making it easy to plan ahead for parties or snacks.
Freezing
For longer storage, individually freeze cookies in a single layer on a baking sheet before transferring them to freezer bags. This prevents sticking and keeps them delicious for up to 3 months.
Reheating
To refresh frozen or stored cookies, warm them briefly in a 300°F (150°C) oven for 5 minutes. This revives softness and enhances the flavors without drying them out.
FAQs
Can I make Halloween Cookies without food coloring?
Absolutely! You can skip the food coloring or use natural alternatives like beet juice or matcha powder to add gentle hues without artificial dyes.
How long do Halloween Cookies last?
Stored properly in an airtight container at room temperature, these cookies remain fresh for about a week. For longer shelf life, freezing is recommended.
Can I use store-bought icing instead of making my own?
Definitely! Store-bought icing works well for quick decorating, though homemade royal icing allows more control over consistency and flavor.
Is it possible to make Halloween Cookies gluten-free?
Yes, by substituting with a gluten-free all-purpose flour blend, you can easily make this recipe suitable for gluten-sensitive guests.
What are some fun decorating ideas for Halloween Cookies?
Try drawing spider webs, ghosts, pumpkins, and monsters using icing and edible markers. Adding candy eyes and sprinkles adds extra spooky personality.
Final Thoughts
These Halloween Cookies are more than just a tasty treat — they are a joy to make, decorate, and share with your loved ones. Easy to customize, fun to craft, and perfect for creating lasting holiday memories, this recipe invites everyone to bring a little sweetness to the spooky season. So grab your cookie cutters, gather your ingredients, and get ready to delight your guests with these festive and fabulous Halloween Cookies!
Related Posts
- Easy Homemade Divinity Candy: Sweet Bliss Recipe
- Irresistible Reese’s Stuffed Brownie and Peanut Butter Frosting
- Easy Cheesecake Stuffed Strawberries Recipe Fun
Halloween Cookies
These Halloween Cookies are a fun, festive, and delicious treat perfect for the spooky season. Bursting with vibrant colors and playful shapes, they are easy to make and ideal for bakers of all skill levels. Customize decorations and flavors to capture the holiday spirit and impress your guests with professional-looking, kid-friendly cookies that bring festive joy to any Halloween gathering.
- Prep Time: 20 minutes
- Cook Time: 10 minutes
- Total Time: 30 minutes
- Yield: 24 cookies 1x
- Category: Dessert
- Method: Baking
- Cuisine: American
- Diet: Gluten Free (when using gluten-free flour blend)
Ingredients
Main Ingredients
- 2 ¾ cups (345g) all-purpose flour (or gluten-free flour blend for gluten-free option)
- 1 cup (226g) unsalted butter, softened (or coconut oil for vegan option)
- 1 cup (200g) granulated sugar (or natural sweetener like honey or maple syrup as a substitute)
- 1 large egg (or flax egg for vegan option)
- 1 teaspoon vanilla extract
- 1 teaspoon baking powder
Decorations
- Food coloring (natural alternatives: beet juice, matcha powder, or standard food coloring)
- Sprinkles
- Decorative icing (homemade or store-bought royal icing)
- Edible markers (optional)
Instructions
- Prepare Your Ingredients: Gather and measure all ingredients carefully. Soften the butter to room temperature for easier mixing. Preheat the oven to 350°F (175°C) and line baking sheets with parchment paper.
- Mix the Dough: In a large bowl, cream together the softened butter and sugar until light and fluffy. Beat in the egg and vanilla extract until smoothly combined. Gradually add the flour and baking powder, mixing gently until a soft dough forms. Avoid overmixing to keep the cookies tender.
- Color and Shape Your Cookies: Separate the dough into portions if using food coloring; knead each portion with your desired color until evenly tinted. Roll out the dough on a floured surface to about 1/4 inch thickness. Use Halloween-themed cookie cutters like pumpkins, bats, and ghosts to cut out shapes.
- Bake to Perfection: Place the cookies on the lined baking sheets, leaving space between each to allow for slight spreading. Bake for 8-12 minutes or until the edges start to turn golden. Let them cool on the baking sheet for 5 minutes before transferring to a wire rack.
- Decorate with Icing and Sprinkles: Once completely cool, decorate your Halloween Cookies with colorful icing, edible markers, and sprinkles. Get creative with designs that match your party’s spooky theme.
Notes
- Chill dough before cutting to keep shapes sharp and prevent spreading in the oven.
- Use parchment paper to prevent sticking and simplify cleanup.
- Remove cookies from the oven when edges are slightly golden to maintain a soft center.
- Customize icing thickness: thicker for details, thinner for base layers.
- Store cookies in airtight containers to keep them fresh and moist for days.
Nutrition
- Serving Size: 1 cookie
- Calories: 150
- Sugar: 12g
- Sodium: 80mg
- Fat: 8g
- Saturated Fat: 5g
- Unsaturated Fat: 3g
- Trans Fat: 0g
- Carbohydrates: 18g
- Fiber: 0.5g
- Protein: 2g
- Cholesterol: 30mg
Keywords: Halloween cookies, festive cookies, kid-friendly baking, gluten-free cookies, vegan Halloween treats, holiday treats, colorful cookies, spooky cookies